Hubspot is a very powerful sales leads database and a great tool for keeping track of client records.
To import a list of contacts it must be in .csv file format and there must be headers such as ‘name’, ‘email’ etc. The categories will be mapped later in the process. Hubspot also requires that each contact has an email, so make sure your file is properly formatted before proceeding.
1. In Hubspot, go to ‘contacts’.
2. Click on ‘actions’ and go to ‘import’.
3. Now you’re in the import dashboard you can go to ‘start a new import’.
You’ll be able to choose a .csv file or import directly from your Salesforce account if you have one.
4. Select your .csv file and click on upload.
The import details will come up and you can choose a file name for the import, if you need to choose a new one.
5. You’ll then be able to choose the advanced details of your upload under ‘Advanced Settings’.
You can choose import type such as ‘list of contacts’ or ‘opt out list’.
There is also an option at this point to assign ‘lifestyle stage’, such as ‘lead’ or ‘subscriber’. In the basic version of Hubspot you will only be able to assign files as ‘subscriber’.
From here you will be able to map your properties for the file. Hubspot will automatically match columns that you have in your .csv file but at this point you can customize them by selecting ‘create new property’ if needs be.
6. Click confirm when done.
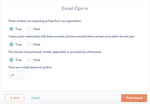
7. You’ll be asked to confirm validity of each category, simply select ‘true’ or ‘false’ and then ‘finish import’ to complete.
Updated on 21 Feb 2018.
Related Posts:


