If you are looking to make a good impression when using your email, then you can add a logo to your email signature. Having your company image attached to your email will make it look more professional and will maximize your brand’s visibility.
Adding an email signature with a logo is very simple in Gmail.
Simply follow these steps:
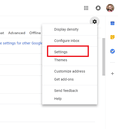
Sign in to your Gmail account and go to the Cog/Gear icon in the top right-hand side of the window.
Select ‘Settings’.
Scroll down the settings page until you come to ‘signature’ (it’s quite a long way down).
You can create a fully customized signature with your choice of font, colours, sizing etc.
There is an option to upload an image (the small icon that looks like a photo of mountains). Select and upload your company image.
For best results keep the image in a maximum of 650 pixels wide, and 150 pixels high. A good size for a small square logo would be 90 x 90 pixels. Anything bigger and the image may look too big at the bottom of the email.
Don’t forget to include the link to your website. After adding all the detail it will look something like this:
When you’re done, scroll all the way to the bottom of the page and click on ‘Save changes’.
You can change the elements of your signature as often and whenever you like, by following again these previous steps.
Note that if you have more than one email account linked, you can create different signatures for each account.
This version of the signature will only be sent from the desktop version of Gmail. You can set a different email signature in the Gmail app but unfortunately you can’t add an image.
Written on 05 Apr 2019.
Related Posts:


